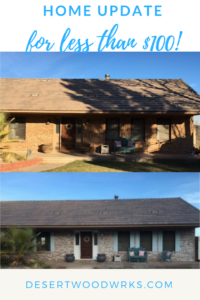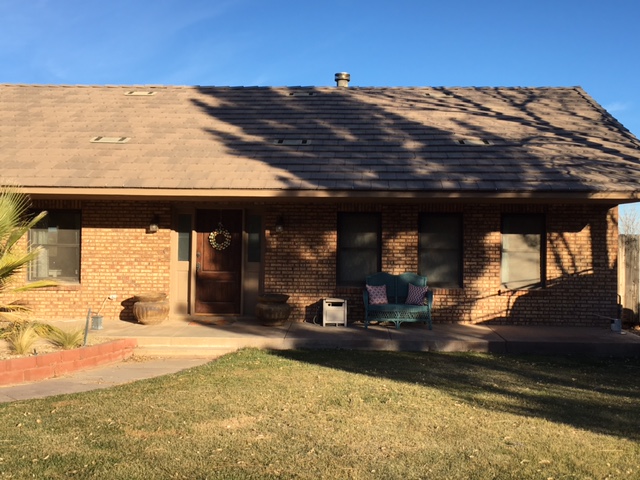
BEFORE

This is my parents house! We moved here when I started Freshman year in school. It used have an ugly forest green front door, a wood shingle roof, and these horrible ugly wood brown pillars. Ten years ago, they re-stuccoed, changed out the old roof, and bought a new front door. In 2014 my mom decided she wanted to remodel her interior and her theme (she has interior design in her genes) was Hampton’s Elegance.
Since then occasionally we would talk about the exterior of her house. Yes it looked a TON better than in the mid 90’s when they bought it but it didn’t quite match the inside of the house. This last weekend, I was at my mom’s and we were watching my little’s playing outside. My mom started talking about the exterior of her house again. The brick really was fantastic, just the wrong color. The front door was a beautiful color, but you didn’t really see it. So we pulled out all her HGTV magazine’s and looked for inspiration on Pinterest.
We decided (yes it was a group effort) to price out new shutters, paint the brick, new lighting fixtures, new pottery by the front door, maybe a new front door, and some cutsie front porch furniture. The goal was to really lighten things up so that the outside matches the inside more. Then we started adding things up in our heads… this could get pricey. Did she really want to spend a few hundred or more on and update? Then it started to sound like a challenge, how inexpensively can we re-do the exterior of this house? Back to Pinterest! This is why I LOVE this website! I knew how to make shutters, as we started pricing it once again the dollar signs grew. Recently I had built a barn door out of dog-ear wood. It turned out pretty well. I suggested to my mom we go for dog-ear wood instead of a more expensive type of wood. This reduced the cost of shutters to $35.00 for 17 pieces of dog-ear wood and 2 pieces of 1×3 pine. We spent Friday evening painting the shutters. We actually created a custom color based on reading HGTV and what the up and coming color schemes were for 2016. Here’s what that looked like:
The next item on the list was what do to with the brick. Like I showed you above the intent was to lighten up the house, so white was a pretty obvious pick. We headed to lowes for a gallon of their most inexpensive paint they had and for about $17 came home with a gallon of Olympic paint.
Ok here’s how I explain the “technique”. It was SO much easier than you would think! A few times previously I had clients that wanted a very rough painting done to their product. When I had previously built and painted shutters for a children’s playhouse I did this same thing.

I used a chip brush. These are about $.99 at Lowes. The reason for a cheap brush is because I wanted bristles that were rough and course. Never fully dipping the brush I kept a very fine amount on the tip of the bristles. When I went to paint the brick I would very briskly and VERY lightly brush the brick. Here’s a BEFORE and AFTER attempted close up of the brick:
The left side has no paint and is original. The right side was the first coat of white. Like I said we started very lightly and stayed only brushed with the tip of the brush. We went back later and added more. The reason I call it a “dry brushing” technique is to sound cool. Ok, I’m kidding. The real reason I call it dry brushing is because the paint dries almost immediately because of how little paint I am using. We did the entire surface of brick and used a 1/4 of the bucket. It took about 2 hours to do the whole thing. Some areas we added a heavily painted piece of brick to make a more natural look. Like it had always been there. If you have more questions on this- comment below or feel free to email me.
So- now the total is $52 and we are moving on to lighting fixtures. If you ever want new fixtures here’s what you do- spray paint yours! (Unless they’re hideous and you really just want new light fixtures.)
If you didn’t notice for $3.80 my mom splurged and went for some grey spray paint on the pottery as well!! We also decided to paint around the door to give the stained door more attention. New total : $59.60
Lastly, dumpster diving! Ok so we didn’t jump in a dumpster. But we found this set of wicker chairs on the curb by some trash cans. It was a pretty ugly color and I could shoot myself for not taking a before photo. I grabbed some cans of spray paint from lower and after a couple of coats… wa lah!
I LOVE the after color! SO add two more can’s of paint and our new total is : $68.00
AFTER
Can you believe it! The total was $68.00 I feel like it looks bright, pretty, clean, and it totally fits with the inside of her house now! Hampton’s Elegance. This was a long post- but the real point is that UPDATES don’t have to be EXPENSIVE!
Here’s the BEFORE one more time so you don’t have to scroll up and down to check it out:

Please let me know if you have ANY questions! I’m always happy to answer any questions!
Thanks for reading and hopefully enjoying this post!
